The tools
Twenty-six panels in five families. The families are a reading order and nothing more: every tool is reachable at any moment, from any layout, and the order you work in is yours. Nothing here rewrites your file — what a panel produces is a recipe the photograph is redrawn through.
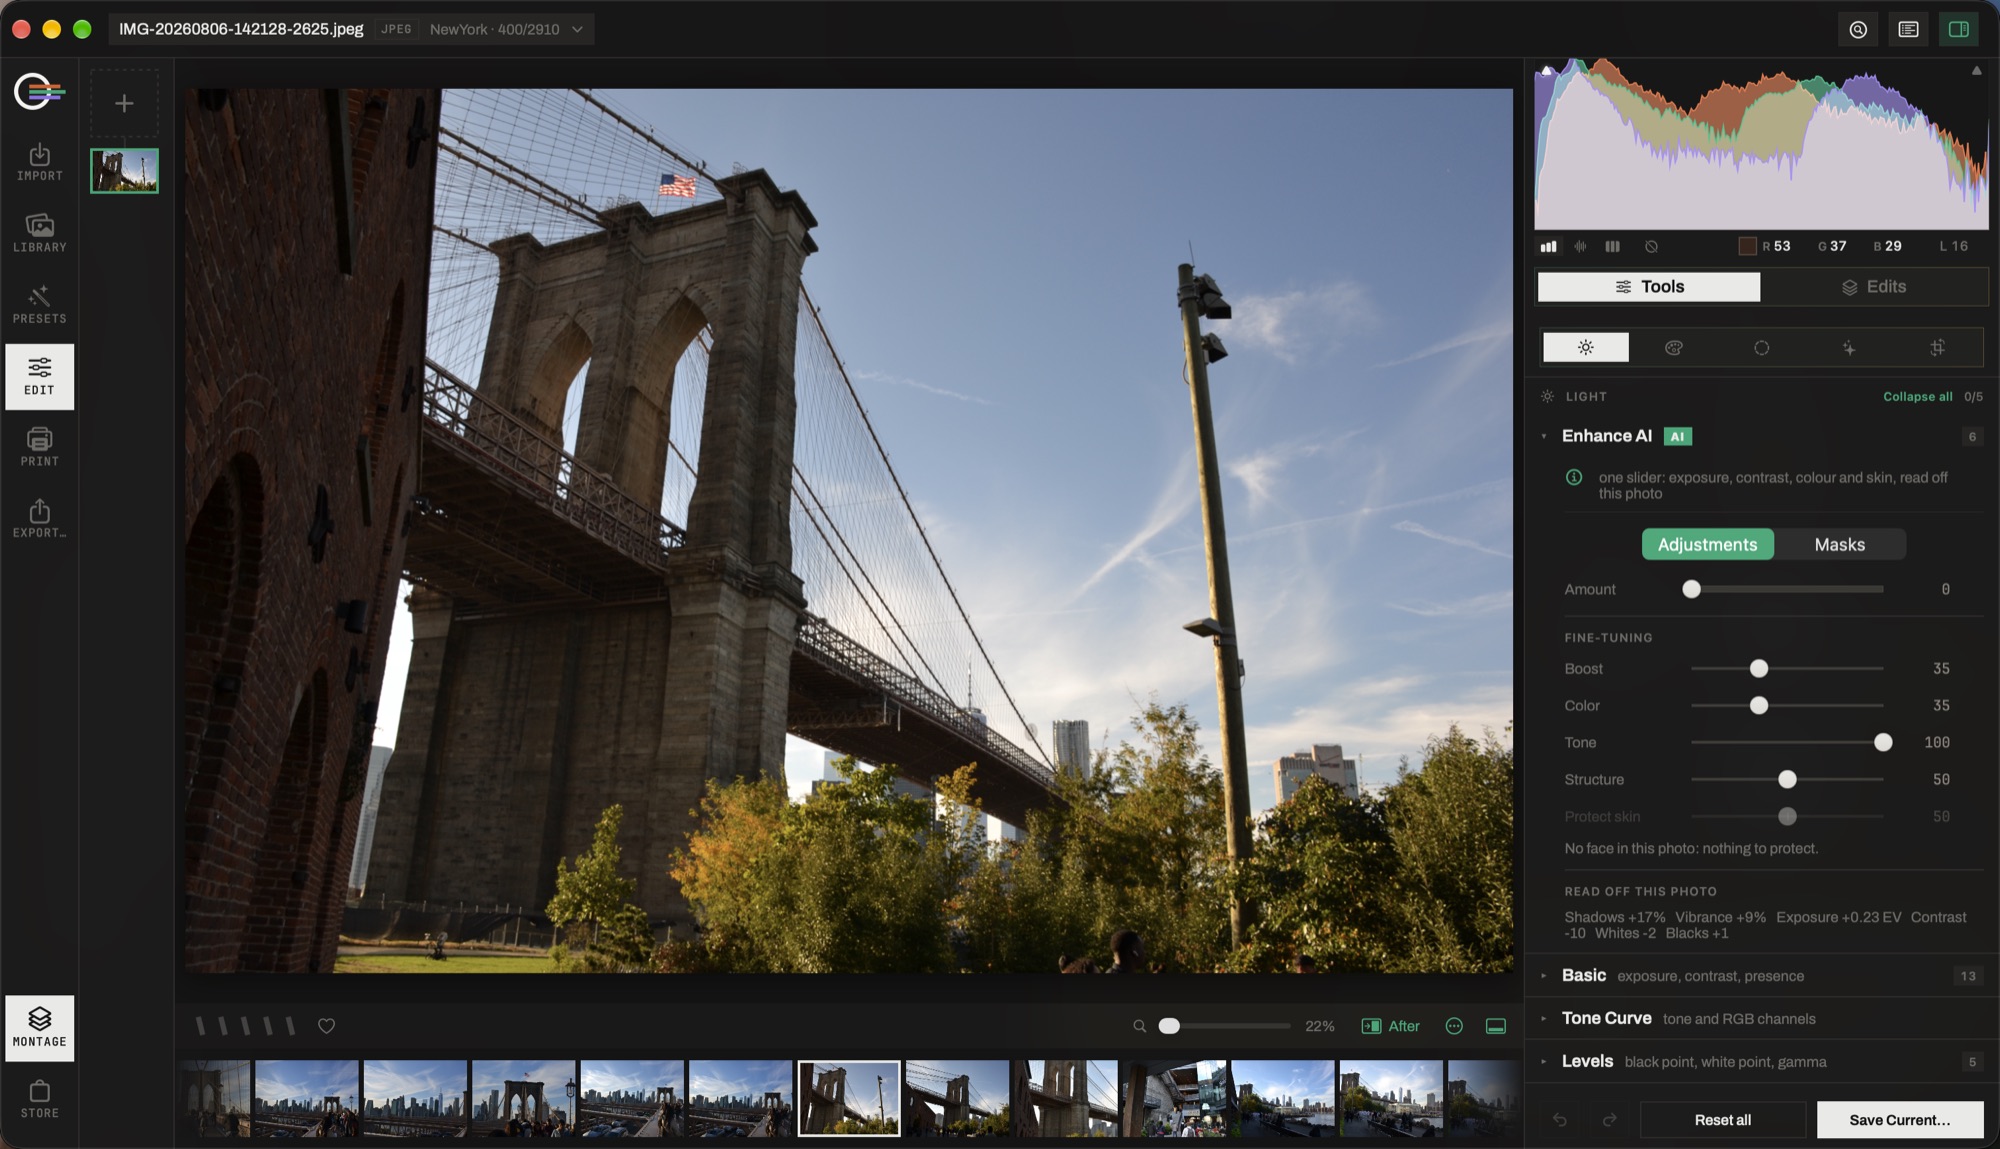
- The scope. Pinned above the tools, on every surface that borrows this column: the histogram, waveform or RGB parade, with the value under the pointer read out beside it.
- Tools · Edits. The panels, or the list of what is currently on this photograph — with its history and your snapshots.
- The five families. Light, Colour, Local, Creative, Geometry. The row navigates; it never hides a tool.
- A panel. Its name, what it is for in one line, an ⓘ that explains it at length, and a badge when it is carrying an edit.
- Adjustments · Masks. Where a tool can be limited to part of the photograph, its own mask tab sits here rather than in a separate module.
- The foot of the canvas. Rating, zoom, and the before/after switch — hold anywhere on the photograph to see the original.
How a panel works
Every panel is the same shape, so learning one teaches the rest.
- The hint under the title says what the tool is for in one line. The ⓘ beside it opens the long version, written for somebody who has not met the control before.
- A badge on the header says the tool is carrying an edit, and how many of its controls are off their rest. Nothing is hidden: a tool you have never touched looks different from one you have.
- Auto, where a tool has one, measures this photograph and writes ordinary values you can then change. It is never a mode you are left in.
- A double-click on a slider puts it back to its rest value; the panel header resets the whole tool.
- Eight tools carry a Masks tab — Basic, Tone Curve, HSL, Black & White, Colour Grading, Detail, Gradient Map and Enhance — so an adjustment can be limited to a region without leaving the panel.
Light
How much light, and how much separation.
- Enhance AI
- One slider: exposure, contrast, colour and skin, read off this photograph. It measures the frame and pushes a correction of its own, so the same value lands differently on every picture — which is why it can travel in a preset and still suit each photo. The panel prints what it read.
- Basic
- Exposure, contrast, highlights, shadows, whites, blacks, white balance, vibrance and saturation, plus the presence trio — clarity, texture and dehaze.
- Tone Curve
- Tone and the three RGB channels, with the plot and the targeted-adjustment tool that lets you drag the curve by dragging the photograph.
- Levels
- Black point, white point and gamma, master and per channel.
- RAW Develop
- The decoder's own options, which the rest of the app never touches: tone boost, local tone map, moiré, noise reduction as camera default or yours, gamut mapping. Applied when you let go of a slider rather than per tick, because each change re-decodes the file. Dimmed on anything that is not a RAW.
Colour
Fix the white first, then the intensity.
- Profile
- The file's starting point: the camera profiles and any LUT you have installed, at the strength you choose, each drawn on your own photograph before you pick it. Favourites, and a default per camera.
- Match Look
- Reads a look out of a reference image — a film still, a painting, another photograph — and rebuilds it in the app's own sliders, which stay editable afterwards. It transfers the distribution, not the pixels, and can be limited to tone or to colour. The result can be exported as a
.cubeLUT. - Colour — HSL
- Hue, saturation and luminance per colour band, with the same drag-on-the-photograph tool.
- Black & White
- The channel mix, at any strength between colour and grey — and, going the other way, AI Colorize for a monochrome original.
- Colour Grading
- Colour wheels for shadows, midtones and highlights, with blending and balance.
- Gradient Map
- Maps the tones onto a gradient you edit as stops on a bar, with thirty built-in gradients named for the processes — cyanotype, selenium, day for night — and a library of your own.
- Selective Colour
- CMYK per colour family, relative or absolute — the Photoshop control.
- Calibration
- Camera primaries and the channel mixer, for matching a body or building a look from the bottom up.
Local
What needs work only in places.
- Masking
- Regions of the photograph, and the tools that read them. One region can be shared by several tools: refine the sky once and everything using it follows.
- Retouch
- Heal, clone and content-aware remove. A spot can be drawn free-form rather than as a circle, and every one of them stays editable for as long as the photograph exists.
- Dodge & Burn
- Lighten and darken by hand, with a brush — the gesture made under an enlarger, on the print.
- Portrait
- Face adjustments placed on Vision's landmarks: blemish removal that heals rather than blurs, skin smoothing that takes the blotches and leaves the pores, eye brightening that tells the white from the iris, teeth, dark circles, lips, face light and shaping. Per face in a group shot, and the controls switch themselves off when there is nobody in the frame.
Creative
The finish.
- Effects
- Vignette, grain, and the optical extras: bloom, anamorphic streak, creative chromatic aberration and lens flare.
- Filter Bench
- A stack of named photographic filters, plus the print and art processes. It has no panel of its own — it lives in the Montage, because each filter is an instance you might want twice rather than a decision you make once.
- Depth
- Depth-driven blur, light, atmosphere and sun, off an estimated depth map. Tap the photograph to put the plane of focus on what you tapped; the rail beside it draws the scene's own distances with the effect's weight curve over them.
- Sky
- Replaces the sky: the selection, the plate, its placement and grading, and the three passes that make it belong — the ambient light it casts, the haze at the horizon, and the decontamination of the blue rim a branch keeps from the sky it was shot against.
- Detail
- Sharpening and noise reduction — and beside them AI Denoise and AI Focus Recovery, which run once over the photograph rather than on every frame, and then blend in like any other slider.
Geometry
The frame itself — the one family you touch once and leave, which is why it sits last.
- Crop & Straighten R
- Crop, aspect ratio and angle. The angle is a dial rather than a slider, because a rotation wraps and a slider's rest value would sit at both ends of the track.
- Transform
- Perspective and verticals, by hand or by guided upright: draw up to four lines along things that ought to be straight and the correction is solved from them.
- Liquify
- Push, bloat, pucker, smooth and restore, by brush, live on the photograph.
- Lens Corrections
- Distortion and chromatic aberration. A correction zooms to fill rather than leaving the picture inside curved black margins.
Two things that are not in this list
Presets have a home of their own in the module rail: they are a saved look rather than a control, and they are browsed by seeing them drawn on your own photograph.
The Filter Bench is reached from the Montage. That is the rule the whole editor is arranged by — a tool is a decision, a layer is an instance: something you want at most once per photograph gets a panel, something you might want twice, masked or blended, gets a place in the stack.